
I recently upgraded my Debonair’s flight instruments, from the basically original vacuum-driven gyros and other mechanical indicators to an electronic flight instrument system, or EFIS. My installation, pictured below, involved removing each of the common “six-pack” flight instruments and replacing them with an Aspen Avionics Evolution 2500 MAX flight display system. There’s more about the hardware in the sidebar on the following page.
Literally decades of familiarity with conventional round-dial flight instruments became obsolete with the stroke of a pen. And I got to do the first solo test flight of the brand-new flight instrument system without ever having flown one before. Fun times. I survived and, after more than 20 hours of tach time in the airplane in less than a month, have some observations that may apply to anyone moving from steam to EFIS and wanting to minimize the additional risk the first few hours with modern instrumentation may pose.
Afraid Of Needles?
By the time the airplane was ready to be flown, schedules coordinated and weather cooperated, I was not current to carry a passenger. Two touch-and-goes followed by a full-stop resolved that, so the shop’s tech could ride along and show me a few things. They were not the best pattern circuits I’ve flown, but the local controllers at the busy towered airport were fond of extending your downwind. The tech and I spent a half-hour outside the traffic pattern, testing the new hardware and how it was interfaced with the rest of the airplane. At this writing, that process continues as the shop and I track down a couple of gremlins. 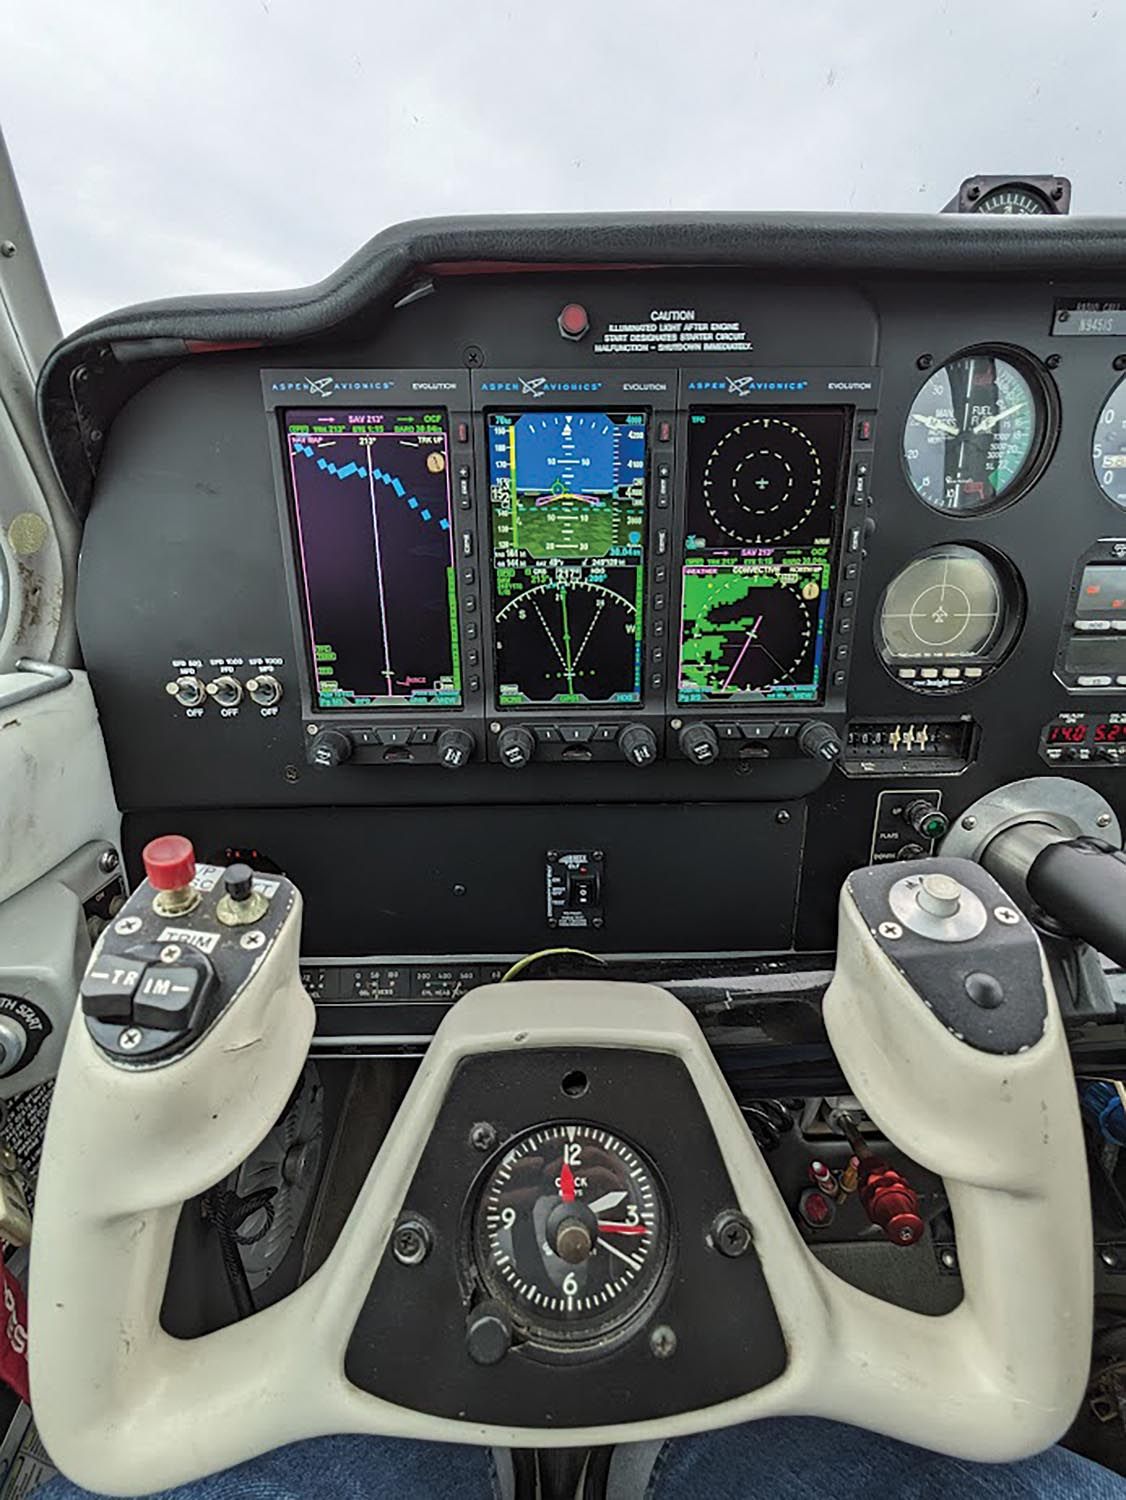
Once the airplane was home in its hangar, my flight instructor and I were able to schedule some quality time together. We spent our first session ensuring my scan had developed to the point I could walk and chew gum in pattern operations, climbs and descents, and manage navigation.
The absence of mechanical dials and their needles took some getting used to. The system’s basic attitude and heading indicators work as the two gyros I removed, but that’s where the visual similarities end. I now have a color-coded vertical tape for airspeed and a similar presentation for altitude, plus symbols representing a turn coordinator’s basic functions, including an inclinometer. Turn rate is presented in a completely different fashion, as is vertical speed. The absence of their mechanical cousins was disorienting at first.
The airspeed tape offers multiple benefits over the round airspeed indicator, including V-speed markers customized per the POH/AFM. Depending on how the autopilot is interfaced, I can set a bug to hold airspeed, as well as altitude and climb/descent rate. In a climb or descent, an inset window appears to indicate the rate and direction, instead of a dedicated instrument.
It took some time before I acclimated to all these differences, included them in my scan and was able to find, understand and process their data without thinking too hard about where the information could be found. The biggest challenge, though, was translating my long-ago round-dial training to the new standard. For me, anyway, it seems easier to interpret the angles formed by the pointers on mechanical instruments than to read a series of symbols and numbers and translate missing a needle or pointer that gave at-a-glance trend information.
Going Raw Data
There’s an old pilot saying that the three phases of coming to grips with automation are 1) “Now what’s it doing?” 2) “I didn’t know it did that,” and 3) “Yeah, it does that.” And therein lies a clue on how I’d recommend a pilot should manage the transition from steam to glass (and perhaps the other way, too): Go raw data. In my world, this means to ignore the bells and whistles, focusing only on the basics—airspeed, altitude and heading in good VMC—for the first few flights. In some ways, that was my only choice, but it should always be Job One.
As my experience grew, I was able to include other instrument indications into my scan and process them into useful information. Yes, I experienced all three automation phases in succession. Depending on the operation and what I want/need from the new panel, I still do to a degree. But I’m happy to say it’s less and less often.
Which highlights what others have said and written about the transition: Start with the basics—the raw data—and then add more layers when able. Always fly the airplane, and that can require your full attention. If you get uncomfortable or frustrated, back down a layer, all the way back down to airspeed, altitude and heading if necessary, and then regain your confidence before adding back some of the automation.
There’s another old pilot saying that applies here: “Never take the aircraft somewhere your head hasn’t reached at least five minutes earlier.” In other words, stay ahead of the aircraft. A modern glass panel should make that easy, and probably will once I get fully accustomed to it.
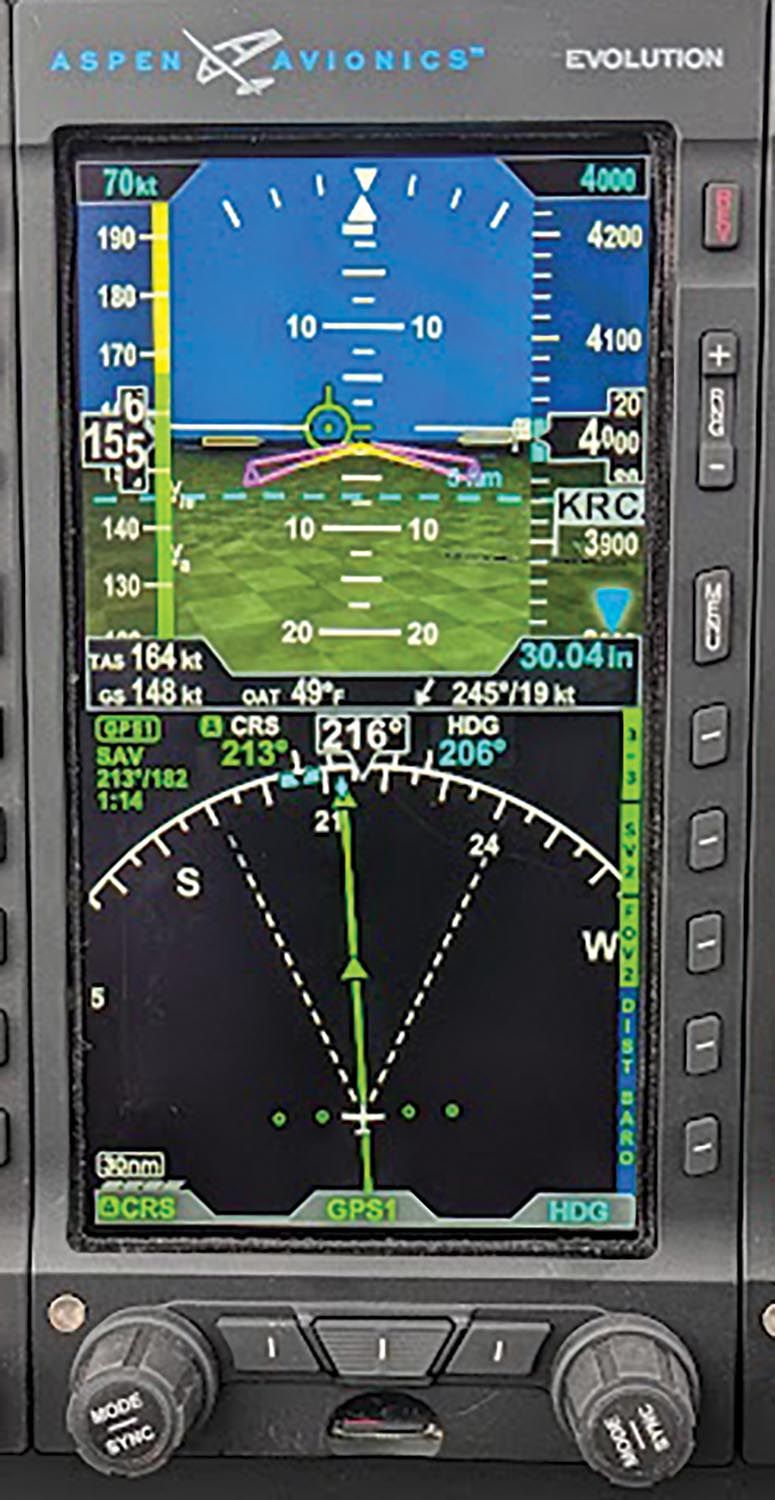 The Aspen Avionics Evolution 2500 MAX is a three-panel installation of their Evolution displays. The middle one, shown at right, is the primary flight display, which is flanked by panels configured as multifunction display. It’s all-electric; the PFD and MFD on the right have individual battery backup. In case of a PFD failure, one button push allows the right MFD to immediately become the PFD, with the same configuration and data. Both flanking MFDs offer the same basic configuration options, with only the right one capable of reverting to a PFD.
That redundancy continues with two roof-mounted air data sensors incorporating their own GPS receivers, and accounts for a couple more GPS-style antennas. Other than ship’s power, the only other connections are pitot/static lines. The vacuum system was removed in its entirety, including the engine-mounted pump and associated plumbing.
One reason I chose the Aspen product was the aforementioned redundancy. Another was that it is supposed to work and play well with the equipment I already have: the GNS 530W, an L3 NGT-9000 ADS-B in/out transponder and the S-TEC 60-2 autopilot. I’m happy with these three units and see no reason to fork over more AMUs to simply get traffic and Nexrad on an MFD.
All told, the removed equipment fit into four medium-size boxes of round-dial instruments, a King KN64 DME and the wet vacuum pump, plus associated plumbing, wiring and two obsolete belly-mounted antennas. I was particularly curious to see what, if any, weight savings I’d realize. After the smoke cleared, the airplane is a full 10 pounds lighter than before the conversion.
Buttonology 101
The good thing about these automation layers and adding them or removing them as necessary is that you likely can ignore the bells and whistles your new panel may offer without much effort, eliminating the need to push a button. When you have the free bandwidth, add back a bell or whistle into your scan.
Lacking formal training, it’s best to start familiarizing yourself with the controls and what they do while you’re on the ground, not stooging around at Mach 0.25, and preferably using a ground power source. You can do this in a hangar, but you’ll likely need to haul it outside to a clear view of the sky to get the most out of this kind of training.
Aspen has free videos which run you through most, if not all, of the three boxes’ capabilities. Meanwhile, Sporty’s also has good training materials, but there’s no representative simulator of which I’m aware.
Of course, the final answer to the question of how to learn the system is to go fly it. Necessarily, my first few flights were either solo or with the technician, but I really didn’t get confident until after riding with my instructor. Doing anything in other than severe clear was out of the question. We then proceeded to knock out an instrument proficiency check. All of it was a learning experience.
It should not need to be said, but launching into IMC without thoroughly understanding a well-tested electronic instrument suite is really dumb, and probably fattening. It’s probably legal—except maybe for the “careless and reckless” FAR, but how will you defend your actions at the post-accident hearing?
What’s Next?
One unresolved issue involves an autopilot interface. By the time you read this, it will be handled in some fashion. Then, I can start learning the system’s more advanced capabilities. Thankfully, I need more practice approaches, especially with ATC involved, as doing them only at non-towered airports omits important real-world elements.
One thing I’m working toward is achieving what I would label Buttonology 102, where I can call up and configure the display without having to hunt for it. More practice approaches are in my future.
Was it a good investment? The installation eliminates some obsolescence issues, offering even greater situational awareness than I had before. When I rise above the “I didn’t know it did that” phase, I’ll do an update.
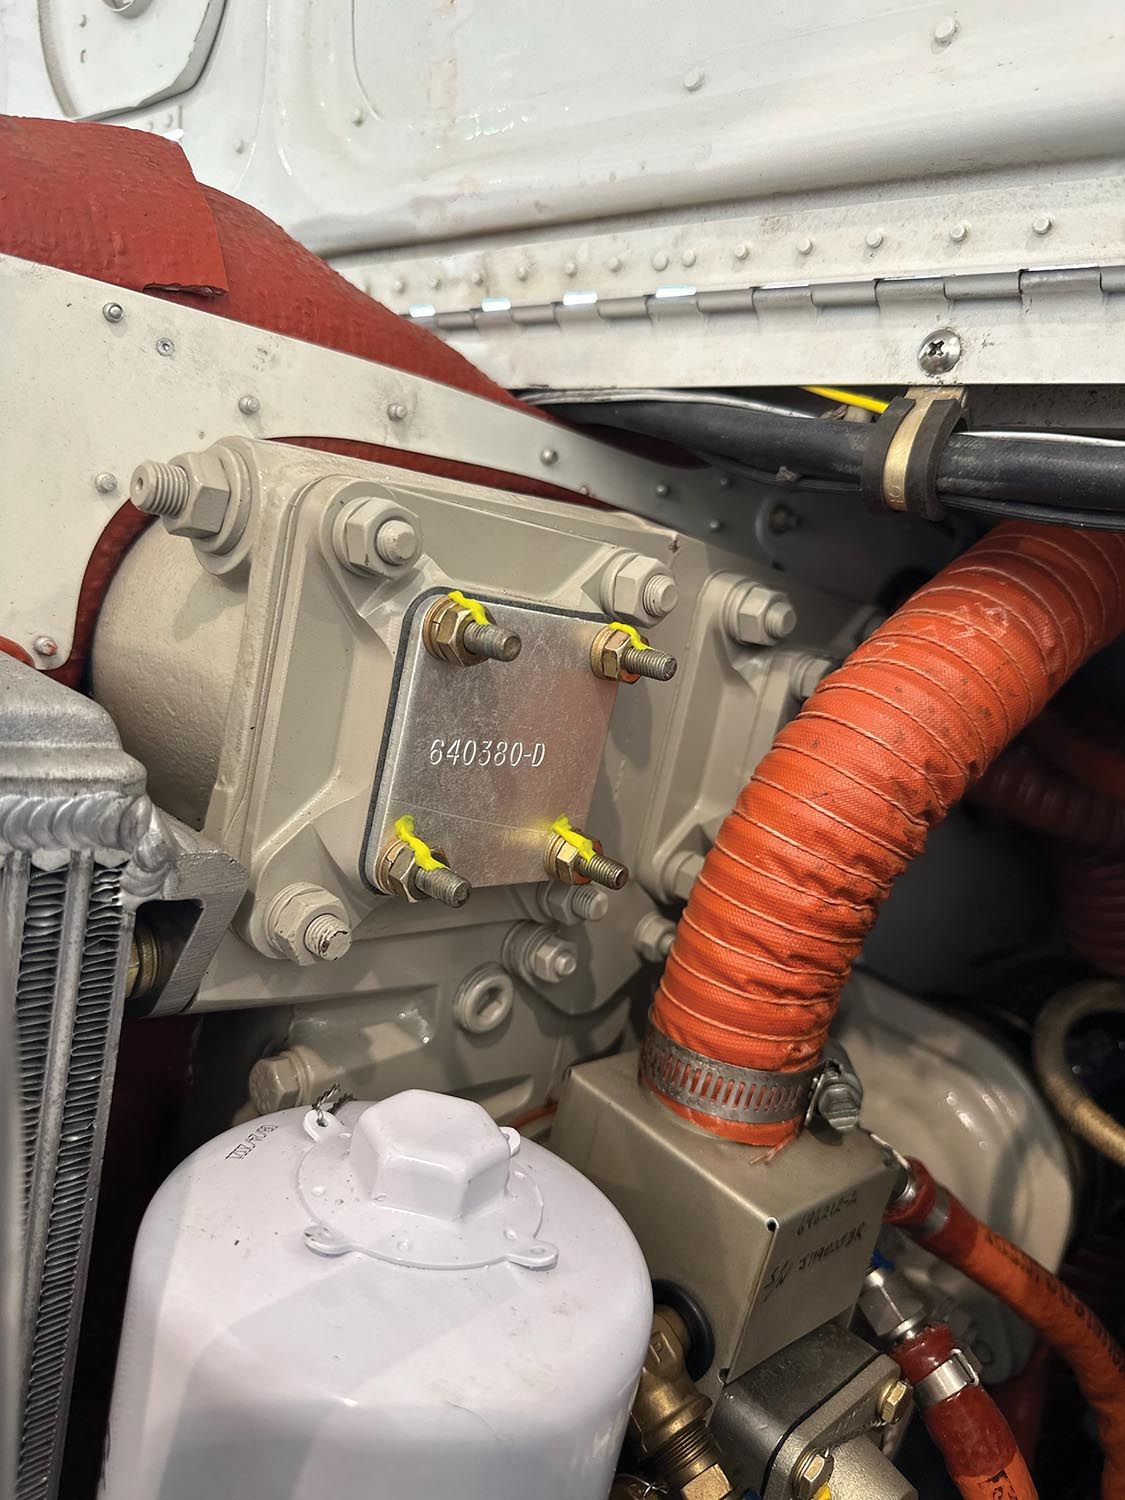
When planning all this, I made a conscious decision to eliminate vacuum instruments, their pump and the necessary plumbing. I’ve always considered engine-driven vacuum/air pumps driving critical flight instruments to be a kludge, even while the basic engineering has stood the test of time. But still….
My pump is/was a “wet” pump, lubricated with engine oil and lacking the carbon vanes of a “dry” pump, which are designed to wear. The photo at right shows the accessory pad where my pump had been mounted, now sporting a fresh cover plate installed with torque stripes.
All of which leaves me with a single power source behind all my flight instruments, where before the installation, I at least had the luxury of a backup electric gyro with the vacuum system. One solution is battery backup of the two main displays, supposed to be good for at least 30 minutes. That’s not much in my view, and won’t let you continue the trip, but it’s better than nothing and likely will get you on the ground. The importance of keeping the electrical system in good condition and ensuring the main battery is fresh should be a no-brainer.

Communication")

JEB:
I enjoyed your article, “Your First Glass,” in your January issue. I bought a new Cirrus SR22 G2 18 years ago with an Avidyne glass panel. At that time, I had nearly 800 hours of flight experience with commercial and instrument ratings. I had flown many hours in actual IMC and was current with my instrument rating. Nevertheless, it took me nearly 20 hours to become comfortable with the digital displays and with what you rightly referred to as “the buttonology” of the new panel.
After four years and several hundred hours of flying behind the original Avidyne panel with Garmin 430 navigators, I upgraded to an Avidyne R9 system. Again, even with hundreds of hours in the airplane, it took me hours of flying with a Cirrus CSIP instructor to become comfortable with the new avionics.
The Avidyne R9 system, similar to many other TAA panels, offers synthetic vision on the PFD. In my opinion, this is a mixed blessing. With the runway and the runway environment clearly depicted on the PFD in front of you, it is very tempting to continue an approach below instrument minimums. ForeFlight on my iPad also displays a digital depiction of the runway. I suppose this would be useful in an emergency situation when all the aircraft instruments failed, but I also believe that it is dangerously tempting to use it to go “just another 100 or 200 feet below minimums” with the airport clearly depicted on the digital screen. I caution my instrument students about this temptation.
Thanks for an excellent article and your publication that always addresses key issues for our continued safe flying.
Blue skies,
Victor Vogel, MD, CFII, IGI