One of the first things an instrument student learns is to scan instruments in the panel, or their EFIS presentation, to determine the aircraft’s attitude. Focusing only on the attitude indication initially, we slowly learn to expand our scan to other instruments, however they’re represented, both for confirmation of what the AI is telling us and to understand the magnitude of our control inputs. Later, as skill and confidence is attained, our scan expands to routinely encompass the other flight instruments for verification.
But that’s only part of the instrument scanning skills instrument pilots learn. As we gain even more experience, we also have to expand our scan to other portions of the instrument panel, like the power instruments, plus engine and systems gauges, and the compass. After all, there comes a time when our double-I isn’t going to be there to keep an eye on the oil pressure. Eventually, we learn to keep scanning all these indications while we manage the avionics, configure the airplane and talk to ATC.
That’s the typical “building block” approach to learning to fly instruments, and it hasn’t changed much over the years. The advent of integrated flight decks, primary flight displays and replacing one or more “steam” gauges with electronic flight instruments has changed some of this, but only to the extent our eye movements might not be as great, and maybe color-coding supplants and/or enhances the information we obtain and, hopefully, retain.
Like almost everything else we do in the cockpit, the instrument scan is a learned skill—our student pilot certificate didn’t bestow on us the ability to hand-fly an ILS down to minimums every time. And we don’t practice it enough. Sure; if we’re doing it right, we always wear a view-limiting device when out shooting practice approaches to retain currency and discipline ourselves to not look out the side windows to verify our bank angle, or look up toward the runway as we cross the final approach fix. But we’ve all seen pilots logging approaches that they flew by looking out the windshield.
We’ve also seen pilots engage the autopilot as soon as the gear is in the wells and fly an approach series without touching the yoke except when we “break out” or to maneuver for conflicting traffic. None of which helps your scan technique and hands-on performance, so let’s explore some tips designed to do just that.
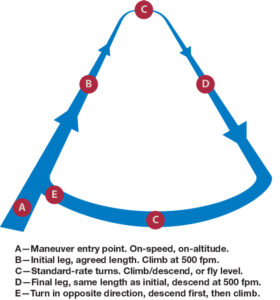
The FAA’s Instrument Flying Handbook (IFH, FAA-H-8083-15B) devotes two sections of the same chapter to basic instrument flight maneuvers: one for conventional steam/analog cockpits and another for electronic flight displays. While the instrument indications differ—but by not that much, actually—the recommended flight patterns don’t. We’ve adopted one of them here—the other patterns in the IFH emphasize procedure turns and circling approaches—but added our own…suggestions.
Holding patterns are boring, so we decided to spice up one of the IFH’s recommendations with some climbs and descents. You can vary these in many ways, by changing climb/descent rates, using constant-airspeed climbs/descents instead of constant-rate, rolling out at point E in the opposite direction, etc. Length can be varied as well, using either time or distance. Of course, whatever speed/altitude you choose for entering the pattern should be the same exiting.
In all cases, don’t forget clearing turns, watch for traffic and ensure there are no airspace incursion issues, TFRs, obstacles, terrain, etc.
1. GO RAW DATA
No, you don’t have to remove your autopilot. You may want to turn it off, however, along with any flight director capability. The idea is to remove from your instrument scan any information that can cue you to what the airplane is or isn’t doing at any one time, or where you should be pointing it. A flight director certainly qualifies. However you eliminate the autopilot from your practice session doesn’t really matter. What does matter is that you fly by referencing raw data, without any “help” from the automation.
You might respond by pointing out that the automation can make your instrument flying more accurate, less fatiguing and even necessary when confronting busy airspace or complicated procedures. And you’d be right. That’s not the point of this exercise, however, and you’ll have plenty of opportunities on other flights to practice punching buttons in the right sequence to make the airplane do what you want. Automation is not what this is about, at least initially.
Instead, this is about flying the airplane by reference to instruments, not cuing bars or highway-in-the-sky boxes we can fly through. It’s about coordinating your standard-rate turns, how you’ll probably need less right rudder when climbing in a left turn and may require some left rudder when descending at cruise power. It’s about keeping the needles and pixels centered and where they’re supposed to be, not letting some silicon lead you around by the nose. Save the automation, flight director HITS presentation and coupled approaches for later, when you’ve mastered your scan and can meet or beat the ACS tolerance standards.
2. LIMIT YOUR VIEW
The old-school Link trainers and curtained instrument-training cockpits had something going for them we typically don’t have when simulating instrument flight in an airplane: absolutely, positively no way to see the outside world. We can still get that today with an aviation training device (see the discussion and the sidebar, both of which are on page 6) or, if you’ve got the bucks, a full flight simulator at some place like FlightSafety International or CAE, which offer a real-world view the instructor typically will turn down to zero-zero, anyway. The rest of us likely are training in the airplane: it’s more fun, more realistic when it comes to other tasks like dealing with ATC and traffic, and we need to fly, anyway.
The problem is that even the most limiting of view-limiting devices isn’t all that limiting. Even without focusing our eyes out the side of a full-size hood, Foggles or some other device designed for simulating instrument flight, there’s typically a slice of our peripheral vision cuing us to the airplane’s attitude. It can become a crutch if we let it, and degrade the value of our practice. Instead of referring to and scanning the instruments to verify our attitude, that additional visual cue subconsciously substitutes for part of our scan.
Erecting a curtain around our side of the cockpit when simulating instrument flight (with a safety pilot, of course) isn’t a viable option. Even with ADS-B traffic on three or four screens in the cockpit, doing so can drastically increase the risk of a midair collision. Don’t even think about it in busy airspace.
Do think, however, about how you might modify your view-limiting device to eliminate that little slice of the outside world, or position something opaque against the window blocking only your view outside, not the safety pilot’s. Failing all that, you’ve got to be honest about even partially relying on your peripheral vision to help keep the shiny side up: Just say no.
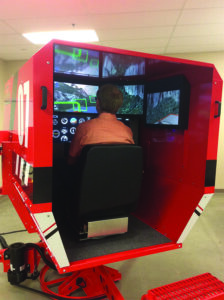
Once upon a time, there was the ATC 610/710/810 line of what were basically desktop flight simulators in the FBO’s back room. They were FAA-approved for racking up simulated instrument time and approaches, but little else. Today, the flight simulator market has exploded, thanks in part to the FAA, with three main categories of sim featuring up to four levels of sophistication within each. You can use a Level D Full Flight Simulator (FFD) to get a type rating without ever stepping aboard the actual airplane. All that costs money, though, and when it comes to practicing and perfecting your basic panel scan, sims beyond the base-level Aviation Training Device (ATD) can be overkill.
Instead, a home computer-based application like Microsoft Flight Simulator or X-plane, even when minimally configured, can go a long way toward retrieving your panel-scanning skills or polishing them up. They’re also good for procedures training, both in the cockpit and instrument approaches/departures/arrivals. With available add-ons, you can develop a home sim that replicates the airplane you fly; you just can’t log the time. Some discipline is required, though: Don’t treat it like a shoot-’em-up game; fly it like you would with your grandmother aboard.
3. GET SOME SIM TIME
It’s likely your FBO or flight training organization has at least a basic simulator—nowadays referred to as an aviation training device—that’s FAA-approved for logging instrument time. Ideally, it is capable of simulating the type of airplane you fly most of the time, but you’re often stuck with few choices in the matter. That’s okay, because not only are we trying to perfect a skill that may have fallen into disuse, we’re also trying to learn something. What better way to get back our scan than to start with a set of instruments we’ve never flown before? Yes, you might run up a larger tab just getting used to the panel, but that’s valuable training, too.
Typically, sim training focuses on shooting approaches. That’s okay as far as it goes, since the same maneuvers recommended for use in perfecting your scan also are part of a typical approach, at least the full procedure. And who doesn’t need to shoot more approaches? But if your scanning isn’t up to shooting approaches, or the airplane being simulated is very far from what you usually fly IFR, the sim still comes in handy.
To make the sim training session worthwhile, explain to the instructor what you’re trying to accomplish and work with them to develop an appropriate plan.
4. FLY INSTRUMENT PATTERNS
If your double-I was like mine, we didn’t get around to shooting approaches until several hours of dual instruction were behind us. Instead, we flew patterns designed to develop our instrument scanning techniques and relate their indications to what the airplane was doing. The sidebar on page 5 has some suggestions, but a series of maneuvers that include climbs, descents, turns and straight-and-level flight will go a long way toward helping perfect your scan, or at least demonstrate you have a long way to go before you should dive into some actual.
It’s certainly true that flying approach procedures, including the procedure turn or other course reversal, can accomplish much of the same thing. But too often there aren’t enough turning altitude changes on an approach, unless you’ve annoyed ATC. The FAA’s Instrument Flying Handbook (see the sidebar on page 5) doesn’t spend much time on climbs and descents, or mix in turns, but it does include the kind of patterns you might fly when circling to a landing after an approach. Our problem with using them to perfect your scan is that they basically are visual maneuvers, and it would be a shame to waste your instrument-training time flying what is basically a VFR traffic pattern. Your mileage (and your instructor’s) may vary.
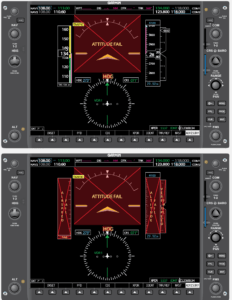
Few of us enjoy partial-panel work, but it can be a good crash-course (sorry) in perfecting your scan. Steam/analog panels can be easier to fly on partial panel because the surviving instruments don’t move. Glass panels, like the Garmin G1000 PFD in the two examples at right, can be a whole different animal, since the backup instruments are both steam/analog and perhaps not in a convenient location.
At top right, the AHRS has failed. At bottom right, both the AHRS and the ADC have failed. You can buy appliqués to cover the relevant portions of the display or use some other material to mask them off.
How do you know you’ve mastered partial-panel? When you can shoot an ILS to minimums without all the magic and remain within the ACS tolerances.
5. SLOW DOWN
One thing many instrument pilots forget when working on their scan is that steaming around at the speed of heat isn’t all that helpful. It certainly won’t boost our ability to hand-fly the airplane to the pass/fail standards of the ACS. For one thing, things happen faster when flying at a high cruise speed, and a moment’s inattention while you reset the mixture control after a go-around may find you sliding off on a wing. That can happen when you’re not working on your scan but also when doing it in the clag for real. One solution is quite simple: slow down.
Things will happen more slowly. Duh. You’ll have more time to spot trends the instruments are displaying, and more time to recover if things get out of hand. You also can learn to fly more precisely, using, say, 20 feet and two degrees for your altitude and heading tolerances instead of 100 and five. Another benefit of slowing down is that the airplane likely will become less stable and mushy, since there’s less air flowing over the wings, tail and flight controls. That works to your benefit—just as it gives you more time to spot and correct trends—since you may have to work harder to stay within your tolerances. Work hard, train hard.
Once you perfect your scan and can fly the airplane without noticeable movement of any of the flight instruments, you can pick up the pace a bit by accelerating, and then acclimating yourself and your scan to the new configuration. It’s likely the airplane will be more stable, but it’s also likely you’ll have less time to recognize and correct trends away from the desired flight path. You’ll know you’ve graduated instrument-scan school when you can keep everything within half the ACS tolerances at normal cruise.
CONDUCTING THE SYMPHONY
I’m not the first one to suggest that instrument flight, and properly scanning the gauges and indications, is akin to conducting a symphony orchestra (not that I’ve ever conducted a symphony orchestra). Just like that orchestra, however, there are a lot of moving elements to instrument flight; keeping each of them in tune and contributing to the overall experience has to be similar.
Carrying the metaphor further, there’s a set of instruments in front of you, whether steam, glass or brass. It’s up to you to manage them and produce the desired results. You can’t do that without a solid foundation in the basic hand-flying skills, and the instrument scan is that foundation.
Jeb Burnside is this magazine’s editor-in-chief. He’s an airline transport pilot who owns a Beechcraft Debonair, plus the expensive half of an Aeronca L-16B/7CCM Champ.


