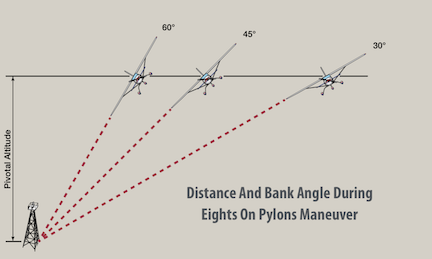
A long-time pilot-friend of ours tells a story about his first check ride for the commercial certificate. Everything was going relatively well until the examiner asked him to perform the eights on pylons maneuver. His response was something along the lines of, “Yes sir, thank you, sir, and what altitude would you like, sir?” The examiner ended the check ride and told him to come back after talking with his instructor about pivotal altitude. When he did, he learned that the correct pivotal altitude for a given groundspeed allows a banked line of sight from the cockpit directly parallel to the lateral axis of the aircraft to the pylon, a stationary object on the ground. Our friend went on to be one of the first pilots to fly the Airbus A300 in the U.S., for Eastern Airlines.
Most commercial applicants really, really don’t like the ground-reference and performance maneuvers. They know—or have a pretty good idea—that lazy eights and chandelles have little practical application in the flight levels, with steep spirals and steep turns important only when you want to be on the ground right now. And perhaps the commercial maneuver getting the least respect/greatest dislike is eights on pylons.
The basic maneuver is to fly a horizontal figure eight over the ground, almost circling easily observed surface features—the pylons—for the loops before leveling the wings and maneuvering to the second pylon. Turn in the opposite direction around it and fly back to the first pylon. Another way to think of eights on pylons is as eights around pylons, “except altitude is varied to maintain a specific visual reference” to them, according to the FAA’s Airplane Flying Handbook, (AFH) FAA-H-8083-3B. Rinse, repeat until the examiner calls it off. Sounds simple, right?
The maneuver’s quality is judged by the pilot’s sight picture during the horizontal loops. The idea is to establish a sight picture of the pylon relative to the airplane’s wing and maintain it as you turn about the pylon. In other words, line up the pylon with something like the second row of rivets aft of the wing’s leading edge and keep it there, through more than 180 degrees of turn. Use aileron, rudder and pitch to manage the sight picture. And don’t forget to roll out of the turns in time to head off to the other pylon.
Although the commercial airman certification standards (ACS) and the AFH don’t discuss using power during the maneuver, that can quickly get out it of hand. Even if you pull it off, it’s unlikely to earn you any Brownie points with the examiner. The ACS does say the bank angle should be no more than 40 degrees. The examiner wants to see the applicant make “corrections so that the line-of-sight reference line remains on the pylon” and maintain the pylon’s sight picture at the appropriate pivotal altitude, while avoiding slips and skids. You also need to “divide attention between accurate, coordinated airplane control and outside visual references.”
The maneuver gets complicated thanks to the wind and how the sight pictures differ when viewed along the two different lines of sight—parallax. Each turn presents one of two different sight pictures, and what worked well to perform the maneuver when turning left may well require the opposite in control inputs when turning right.
Altitude And Groundspeed

By now, you might be thinking, “This is a cinch. When do we start?” Remember when we mentioned how wind complicates things? Presume you have a five-knot wind. If you align the pylons with the wind, you’ll see a 10-knot groundspeed difference while performing the loops around each one. You’ll see crosswind effects if you choose pylons aligned perpendicular to the prevailing wind.
That’s important because groundspeed determines how much you need to bank during the loops. As groundspeed increases, the pylon will move aft in relation to that line of rivets you’re looking at for your sight picture. Naturally, it will move forward when slowing. Likewise, You’ll want a more shallow bank when groundspeed is lower, like when flying into the headwind while trying to maintain the same sight picture, and a steeper bank—still not to exceed 40 degrees—with a tailwind during the maneuver.
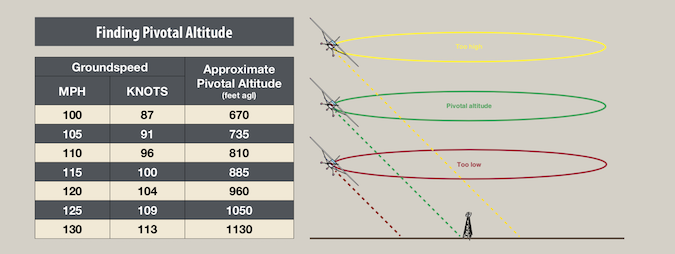
You’re probably also wondering about this article’s title, and altitude’s effects when flying eights on pylons. The table and graphic on the opposite page can help us find the Mama-bear altitude at which we want to fly the maneuver, but only at our nominal groundspeed. If we want to fly eights on pylons at 100 knots groundspeed, for example, we might need to do some flight planning to learn the anticipated winds and then come up with the airspeed and power setting that will produce the desired groundspeed.
If we do plan to fly the maneuver at 100 knots groundspeed, we’ll ideally want to be at that value when we’re directly downwind—and perhaps flying in a crosswind—while circling the pylon, accepting the groundspeed fluctuations. The good news is that, unless the wind at 1000 or so feet agl is really honking, we’re only talking about a few knots difference when circling the pylon. If the wind is honking, maybe it’s not the best day to do the maneuver.
There’s a formula for calculating pivotal altitude used to create the table at the bottom of the opposite page:
To use the formula, square the desired groundspeed, then divide by 15 (if the groundspeed is in miles per hour) or divide by 11.3 (if the groundspeed is in knots). Then add the mean sea level (MSL) altitude of the ground reference.
Since flying eights on pylons is designed to require maneuvering in all three of the airplane’s axes, altitude will vary from the pivotal altitude during each loop. Ideally, you should be at the pivotal altitude when at the chosen groundspeed, and either climbing or descending—while steepening and shallowing the bank—to maintain the desired sight picture. You’ll want to be slightly below pivotal altitude when groundspeed is low, and slightly above with a tailwind.


Every maneuver referenced in your article has value as you progress in aviation. Ground reference maneuvers translate to circle to land skills in an airliner. The dislike you mention has led to a generation of pilots that are now restricted to VFR only for IFR circling on their certificates. Chandelles and Lazy 8s have value in obtaining maximum performance for any aircraft in SIDs/ODPs in mountainous terrain. CFIs have been guilty of not explaining the rational behind these maneuvers since they don’t know themselves and instilling the dislike.
It’s fine to break out your trigonometric calculator and the higher math functions to calculate what the pivotal altitude should be based on a ground speed. But when the rubber meets the road – or the wing meets the relative wind – the hard part is to adjust your altitude to match the performance in the midst of the maneuver, as precisely as one can. If the ground point is moving forward on the wing, you’re going too slow, and you need to descend to get to the correct altitude. If it’s moving aft, you’re going too fast and need to climb. This is the part that demonstrates the mastery of the aircraft – making the airplane do precisely what you want it to do – which is the point of many of the Commercial maneuvers.
And, for R. Thorson’s comment, most of the reason that modern type ratings have the circling limitations is that even a modern level D simulator has a hard time giving a good visual representation of a visual approach, because it has a maximum of only about 180º of vision; you can’t see behind you to see the runway at the point where you should be turning your base leg, for example. And almost all training is done in these simulators now.