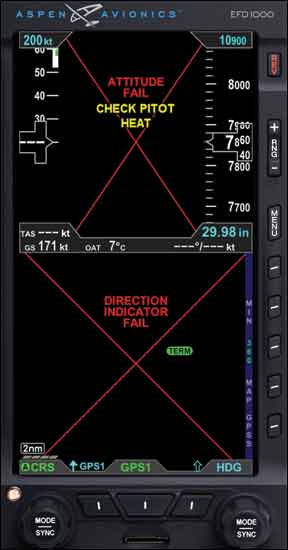
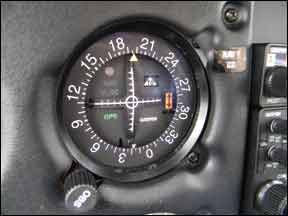
As an avionics guy, Im often asked if I would rather deal with total avionics failure in an all-glass or round-gauge aircraft. My preference is all-glass because total failure is pretty unlikely. And even if it did happen, the situation shouldnt be debilitating. With dual batteries, dual electrical systems, standby instruments and a portable GPS, theres little reason why you couldnt put down safely. But for an older retrofit panel, the risks are elevated. 288 You dont have to be an avionics tech to understand what makes your panel tick, but you do need to know what can make it a ticking time bomb. Perhaps you pushed the wrong button sequence for an autopilot-coupled approach, or maybe an encounter with ice has turned your Aspen PFD into an expensive tic-tac-toe game. Knowing how to troubleshoot on the fly the way a technician might troubleshoot on the ground can keep you alive. Heres some advice for taming the avionics when the automation you trust and rely on tries to kill you. Botching the Buttons A wake-up call for me came one evening while riding shotgun in a glass airplane over the mighty Blue Ridge Mountains. As with many all-glass panels with integrated autopilot, an altitude preselect system feeds the autopilot for nicely automated climbs and descents. But the pilots end of the bargain includes entering the correct altitude for level-off. The ATC instruction was to descend and maintain 6000 feet. A few minutes later I was sitting up straight in the seat as the controller aggressively asked to what altitude we were descending. We all knew it wasnt 6000. Turns out the preselected altitude we programmed was bringing the airplane to 5000 and the pine trees decorating the landscape. How two pilots could miss such a potentially disastrous key punch-and read back the correct assigned altitude-kept me sleepless for several nights afterwards. Beware of this careless trap. Button-botching can be especially common when programming Garmins integrated GNS units for an approach. Theres a lot to do. Since the navigator ties to a single nav indicator but switches both GPS and Nav course data, its the pilots chore to first select, load and activate the correct approach procedure. Once thats done, you need to display the proper course information: VLOC for flying a raw data approach (ILS, localizer, etc.) or GPS for an RNAV or GPS-based approach. And when flying an ILS, the navigator automatically loads the appropriate frequency into the standby window of the nav radio. If you dont switch this frequency to active, youll be scratching your head wondering why the localizer and glideslope isnt alive. For older-gen IFR GPS interfaces where a standalone GPS and Nav radio share a single indicator, some are wired for ILS-lockout. In this configuration, a dialed ILS or localizer frequency locks out the ability to switch the CDI to GPS mode. This is old-school, but plenty still exist in airplanes that havent been upgraded in a while. An acquaintance who purchased a used airplane almost didnt make it home on the ferry flight while shooting a GPS approach to minimums because he was unfamiliar 288 with this “feature.” GPS/GPSS Heading Confusion Perhaps one of the most confusing sequences of button pushes is activating the autopilot to fly a GPSS digital steering command. To get this right, you absolutely, positively need to understand some theory. If your shop turns you loose without explaining this to you I suggest you find another shop-its that critical. The GPSS is little more than a converter-changing a digital signal to a heading-error signal. This is essentially the same input an autopilot receives from a heading gyro for heading command. Thats why for GPSS to work, the autopilot needs to be in heading mode (an exception is the S-TEC 55X, which has a dedicated GPSS mode). Still, programming a GPSS includes multiple button pushes that in the heat of battle can be confusing even for the experienced. And this very head-scratch confusion fell upon an ATP with a newly installed Aspen PFD. He found himself almost face first into a mountain on a missed approach. The procedure called for a climbing right turn to the missed approach waypoint. The Aspen has built-in GPS steering (GPSS) that must first be activated by a soft key on the display. The autopilot-while in GPSS mode-remains in heading, of course. Can you picture the workload overload yet? The pilot, with hands full cleaning up the airplane on the go, talking to ATC and eyes focused on the engine monitor in hopes of not roasting his big-block Continental, simply forgot to engage the GPSS soft key on the Aspen. With the autopilot in heading mode, the airplane in the clouds and the heading bug still positioned for the final vector to join the approach he just missed, the airplane turned the wrong way-or at least the way the heading bug was set. Thats why the pilot guides for the Aspen and autopilot call for placing the heading bug on the missed approach course. Take it one step further and add a GPSS step to the missed approach checklist. Autopilots-Friend or Foe? The autopilot you expect to serve as your get out-of-jail-free card might be the nail in your coffin. Thats why you need to understand the relationship between a total or partially failed PFD (or mechanical HSI) and the functionality of your autopilot. For example, with an S-TEC 55X coupled with most PFDs in an unaligned state, the only functional lateral autopilot mode is GPSS (GPS steering) mode. In this mode, the autopilot uses inputs from the blind turn coordinator and steering commands from the GPS receiver. Dont expect course, heading command or raw nav tracking. For some fail-safe, if your shop you have an Aspen PFD and your aircraft is equipped 160 with an S-TEC 55X, the interface can be wired so this GPSS mode can be engaged directly on the autopilot controller, bypassing the integral GPSS in the Aspen. The benefit? A failed Aspen will still allow the GPS to command the autopilot. Aspen initially warned shops that wiring it this way can cause some button-pushing confusions. Still, I like the fail-safe redundancy in case the Aspen goes dark. And, you can still command GPSS from the Aspen when its all working. Speaking of fail-safe, an autopilot feature tagging along with the Aspen that deserves kudos is the GPSS wings-level mode. If the GPSS is active and the GPS source is lost (not unheard of and often unrecognized by the pilot) the GPSS mode automatically switches to a wings-level state and alerts the pilot to select another means of tracking. When disconnecting an autopilot, the preferred method is to use the yoke- or panel- mounted disconnect button. This disconnect circuitry removes voltage from the servos. Disconnecting by chopping power at the autopilot master first could leave residual voltage on the servo clutch-preventing it from disengaging and keeping the controls locked. Of course, if all else fails, pull the autopilot circuit breaker. Not So Subtle Failures Do you know what frequency is stored in the com radios should your displays go dark? Some systems retain the last stored active and standby frequencies while others revert to 121.500 MHz. Its something to research for the system you fly. A portable com transceiver with external antenna is another way to skin that cat. In dual-battery, dual-electrical system configurations you need to know which capabilities will be lost during a failure mode. If a primary battery fails, the standby battery automatically takes the slack for power-likely powering a select number of systems wired on the essential bus, providing automatic load shedding. The regs generally state that standby batteries provide power for about 30 minutes. One of the perceived benefits of glass display presentation over mechanical instrumentation is the ability to easily recognize failure modes. Im not so sure this is the case particularly for pilots struggling to make heads or tails of a newly installed interface. To contrast, while a mechanical gyro might fail slowly, it generally exhibits what I call a hard failure. It will likely roll over and play dead in reasonably short order-at least in a matter of time that an attentive pilot can figure it out and go partial panel. But for a busy and information-intensive glass display thats fed by numerous remote sensors, recognizing the failure of a critical input might not be so easy even if the display is flashing a warning message. Thats why the FAA originally required redundant mode annunciation for the GNS400 and 500 series WAAS navigators when they were mounted far from the pilots scan as in some older Beechcraft models, to name a few. If the box is annunciating a warning saying, “Approach downgraded-Use LNAV minimums” on a precision GPS approach, you need to know this fairly soon. While on the topic of approach navigators, Ive been on numerous post-installation flight tests where pilots new to the interface had difficulty deciphering the glideslope presentation on a newly installed indicator. As odd as it may seem, a flagged glideslope needle thats stowed center-showing the aircraft exactly on the glideslope-has tricked many inattentive pilots despite the red flag thats in view. Talk about a killer. A confused pilot may be so focused on centering the glideslope needle that he ignores the flag. Maybe the incorrect frequency was entered in the nav radio, maybe the CDI was placed in the wrong mode, or maybe the glideslope is out of service. Whatever the case may be, make a point to vocally call out “glideslope or localizer valid” confirming the flag drops out of view on an approach. A more subtle failure might be in the electric elevator pitch trim. For aircraft that have automatic trim-where the autopilot runs the trim to correct for changes in pitch and altitude-this can be serious business. Some autopilots like the S-TEC 55 series have an annunciator on the control head that indicates when and in which direction the trim is running. You should always be conscious as to what position the trim is set. A common trick is to rest your knee or the side of your leg on the trim wheel so you can feel when its moving. If its not so easily placed, try to keep your hand on the wheel in critical phases of flight. And, before disconnecting the autopilot, verify the position of the trim. A functioning autopilot should have the trim reasonably set at neutral or close to whats normal for straight-and-level flight. Ever disconnect the autopilot when the pitch trim was set full-nose up? If you have, youll never, ever want to experience it again. Try it close to the ground in a low-speed, landing configuration, and you might not ever have the chance. Conclusion You certainly dont need to be an engineer to sit down with your favorite beverage and read interconnect schematics for your installed avionics. Of course, its worthwhile to have access to the installation manuals for the equipment in your aircraft. Palling around with a trusted avionics pro for some basic review of the interface also is an option and can help solve some mystery of what lurks behind the scenes of your panel. Early and positive recognition of failed systems is the key to surviving avionics problems. Having a backup plan in place and ready for execution is one of your best options when it comes to modern automation. And a little hood practice with the backup systems wont hurt anything, either.


The article mentions key actions pilots can take, like using the correct disconnect procedures and having backup plans. We can delve deeper into those and discuss other mitigation strategies.