It’s impossible to deny the importance of risk management in maintaining safe flight operations. Accident data consistently show the root cause of some 75 percent of general aviation’s fatal accidents is the pilot’s poor or non-existent risk-management skills. Whether they were never properly trained to consider the consequences of their decisions, didn’t understand those consequences or minimized their importance, we’ll never know. But we do know that a large proportion of them could have been prevented if the accident pilots had performed even minimal analysis of the risks presented by their proposed flight.
Pilots need to understand risk management principles and be able to apply them before and during flights. A flight-risk assessment tool (FRAT) can streamline this process, but it shouldn’t be used mechanically. In addition, using a “scoring” or numerical risk rating to make a “go/no-go” decision is less effective and desirable than intelligently identifying, assessing and mitigating identified risks so that the mission can be completed.
Critical Procedures
In previous issues, I’ve discussed the predominance of poor risk management as a root cause of fatal accidents (e.g., “Analyzing Fatals,” March 2012 Aviation Safety). Pilots continue to come to grief because they do not effectively identify, assess and mitigate risk. In numerous accident samples I’ve analyzed for clients and for the NTSB, I’ve demonstrated that this phenomenon applies across the board. It affects pilots of all experience levels as well as all aircraft models from simple trainers to complex aircraft with advanced technology. In most of the samples, the percentage of risk management accidents hovers around 75 percent, plus or minus about seven percent.
We shouldn’t be surprised at these results, given the state of our flight training system. The FAA has only in the last several years updated training doctrine, such as FAA handbooks, to include risk management procedures. I’ve also discussed this previously (“Risk Management Evolves,” November 2011 Aviation Safety).
Even with new training doctrine, the FAA’s practical test standards (PTS) for certificates and ratings may not effectively test a pilot’s risk management skills, as I have also pointed out recently (“Ineffective Practical Test Standards,” November 2012 Aviation Safety). For example, the PTS for most practical tests requires an applicant to complete a manual flight log with checkpoints, courses, and other relics from the Lindbergh era. This might be a good idea if you’re flying a no-radio Cub or similar aircraft, but most aircraft today have redundant radios, moving maps with electronic flight plan entry and other advanced features. Examiners should be testing the applicant’s mastery of these technologies—and a reversion to more primitive methods only as a way to simulate loss of equipment. In my view, I’d rather see an applicant show me his/her risk management analysis rather than an antediluvian flight log.
Basic Principles
I’m sure I’m about to lose faithful readers who have heard these points before, so let me move to my central premise in this article. Despite the assertions I just made, the FAA pilot training doctrine and standards are beginning to evolve into a more effective incarnation. Meanwhile, you don’t need to wait for this evolution to mature, especially if you’re already a rated pilot and don’t plan to take another practical test anytime soon.
The key to your future safe operations is to conduct effective risk management procedures for all of your flights. You can start by mastering basic risk management principles, which essentially involves identifying all potential hazards to a proposed or ongoing flight, determining which of those pose a risk, assessing the likelihood and severity of those risks, and finally mitigating the risks to lower levels of likelihood and/or severity.

288
As you train to become proficient in risk management, you will migrate to a higher level of understanding and execution. Initially, you should take a risk management course that allows you to become familiar with basic risk management principles. In this phase, you will learn how to decompose all of the risk factors. This includes assessing risk, which you will probably do by consulting a risk assessment matrix such as the one in the sidebar at right.
This process can be somewhat subjective at first, since the “buckets” for each combination of likelihood and severity can be very broad and imprecise. You will become more effective at risk assessment with practice. Once you’ve identified and assessed the risks, the final step is risk mitigation. The key is to lower the “high” and “serious” risks to either “medium” or “low.”
In practice, how will you conduct the three-phase risk management process while planning a flight? It’s clear that identifying and assessing risk by de-composing and analyzing fully all the potential hazards to your proposed flight can be time consuming. You will eventually be able to do this more quickly, efficiently and intuitively once you accept the need for a risk management analysis for all your flights and begin using a defined process.

288
To provide structure to risk management procedures, a number of organizations have developed flight risk assessment tools—FRATs— that streamline the risk de-composition process. The idea of a FRAT is to identify key elements of typical flight hazards and combine them to make assessment easier. For example, rather than measure gradations of ceiling and visibility to evaluate a common weather hazard, a FRAT may only flag such a hazard if it’s worse than 500 and one. If you don’t have an instrument rating, the FRAT may identify it as a hazard if it’s worse than 2000 and five.
The best way to illustrate this is to look at some FRATs that capture the concept behind these tools.
Typical FRAT Examples
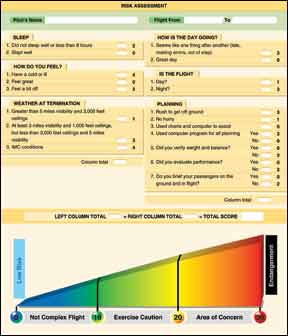
There are many variations of a FRAT and it isn’t possible to cover them all and explain their use in a short article. Instead, we can look at a typical one that uses a numerical rating or “scoring” system to assess risk. With reference to the image at the top of this page, let’s look at what the FAA has to offer.
This FRAT uses a simple “check the box” approach to analyzing risk. Once you complete the scoring process, you then refer to the scale at the bottom of the FRAT to measure what this tool calls the level of “endangerment.” Obviously, a flight rated as “not complex flight” signals it’s all right to go, while a score between 20 and 30 can be an “area of concern,” whatever that means. If you’re in the middle, you should “exercise caution.”
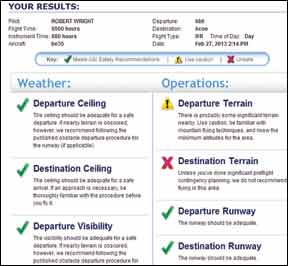
Member organizations and other entities have also developed similar tools. For example, the National Business Aviation Association (NBAA) has developed a Light Business Airplane Operations Manual Template containing a FRAT. It’s located in the members-only section of the association’s Web site, www.nbaa.org. The Air Safety Institute (ASI) of the Aircraft Owners and Pilots Association (AOPA) has also developed a FRAT, called the “Flight Risk Evaluator.” It, too, is available on the organization’s Web site, www.aopa.org, and also only to members. Rather than employ a pure scoring system, the AOPA ASI FRAT is an online tool prompting users to input various parameters for a planned flight. It scores the results and tabulates the risks in one of three categories: “meets ASI safety recommendations,” “Use caution” and “unsafe.”
Using a FRAT It’s interesting to try using one of these tools for typical flights that you make to see what results come out and compare those to how you typically fly those routes. I decided to use the ASI “Flight Risk Evaluator” to evaluate a hypothetical but typical flight I often make in my V35 Bonanza, in this case from Bellingham, Wash., (KBLI) to Coeur D’Alene, Idaho (KCOE).
I selected comparatively benign conditions, with 1000-and-three weather, no icing or convection, daytime conditions and under IFR. The ASI tool lets you input for most, but not all, risk factors potentially affecting your flight and relating to pilot, aircraft and environmental conditions, including terrain and weather. Based on the risk factors and data I selected, the results page, reproduced at the bottom of the opposite page, shows one “use caution” and one “unsafe” risk factor.
I find this format is more useful because it provides clarifying narratives in each category allowing the user to conduct further risk assessment in marginal categories. On the other hand, I view this tool as a little conservative on its assessment. For example, I certainly don’t consider the terrain around Coeur D’Alene as unsafe, providing you’ve accomplished normal and prudent pre-flight planning and an in-flight self-briefing before beginning the approach into COE. In this instance, you would want to pay special attention to the missed approach procedure.
I also ran a risk analysis for this hypothetical flight using the FRAT from the FAA’s Risk Management Handbook. The “score” I tabulated was only six on a scale of 30, which ranked it as a “not complex flight.”
Thus it seems that if I just “ran the numbers,” there are no other risk factors to consider on the hypothetical flight I planned, providing I’ve done “significant preflight contingency planning” to deal with the Coeur D’Alene terrain issue identified in the AOPA Flight Risk Evaluator. If that is my assumption, then I’m making a serious risk management error. A FRAT is only as good as the factors it is programmed to evaluate. In this case both FRATs leave something to be desired.
For example, the en route terrain gets no mention in the AOPA FRAT, and terrain isn’t even evaluated in the FAA example. Under conditions of 1000 and three, I’d reject a direct routing from BLI to COE over the Cascade Mountains, even if I was in the clear on top in smooth air (Note: ATC will often approve this route at a minimum altitude of 13,000 feet.). The terrain is just too inhospitable when flying a single in case “something happens.” Even the IFR route of choice over the Cascades—Victor 2 from SEA to ELN—has its drawbacks, but at least your “rocky footprint” is greatly reduced and there are better options on either side and in the middle of the Cascades along this route in the event you must make an emergency divert.
Another risk factor not considered in either of these FRATs is the impact of inoperative equipment or other limitations imposed by your aircraft. For example, if one of my two nav/comms is inoperative, it could be a significant risk factor on this flight even though it’s legal to launch IFR. Neither of the above FRATs considers these issues.
A better approach I don’t want to sound too negative on the use of FRATs. They’re certainly better than using no risk-management techniques at all. It’s difficult, however, to produce a FRAT that’s practical while not being cumbersome and yet covers every conceivable risk element. Nevertheless, a methodical and practical approach to analyzing risk is necessary for every flight we conduct.
The method I favor shuns the traditional numbers-based FRAT in favor of a more process-oriented approach that is still simple to use. It involves the simple and familiar PAVE acronym (Pilot, Aircraft, Environment, External pressures) for risk identification and assessment and the equally simple but less familiar TEAM acronym (Transfer, Eliminate, Accept, Mitigate) for risk mitigation. I’ve covered these terms before in this journal (Train to Mitigate Risk, September 2010, and A Tale of Two Pilots, May 2012), so I won’t cover them in detail again today.
In this case your FRAT becomes a list rather than a score. Using PAVE, you list and categorize all the hazards and associated risks you identified in pre-flight planning, and assess them according to their likelihood and severity using the assessment matrix previously discussed. You will then list the results of the risks in terms of “low” (WHITE), “medium” (GREEN), “serious” (YELLOW) and “high” (RED). In the final column of this list worksheet, you specify the mitigating action you will take to reduce the risk to “low” or “medium.” With practice, this process becomes easy and eventually could become intuitive enough that you could dispense with the worksheet. That said, my advice is to always use a worksheet: It doesn’t have to be pretty and could be some simple, scribbled notes on your flight-planning document.
In-Flight Risk Management
Risk management is a continuous process that must be accomplished as each flight progresses—it is not just an exercise in pre-flight planning. Regardless of the phase of flight, the principles are the same: identify, assess, and mitigate.
You probably don’t want to create lists while you’re flying, but using the risk assessment you created before takeoff is a start, whether it was a completed FRAT, a simple list with mitigation or some notations on your other pre-flight documentation. You will want to continue to monitor the risks you identified before takeoff. Some of them may have increased in severity and/or likelihood while others may have decreased or disappeared. In addition, new hazards and risks are likely to appear during the flight and you must identify, assess and mitigate them, also.
Summary—Think Mitigation
Using a FRAT will not magically resolve or reduce your risk management responsibilities. They can be a useful tool in organizing your approach to this important task, however. Regardless of whether you use a FRAT or not, you should always develop your risk management skill set and recognize it as a critical part of maintaining safe operations. The following steps will help:
• Take a risk management course.
• Use a FRAT or follow another systematic approach to identify, assess, and mitigate risks during pre-flight planning and continuously during the flight.
• Always be cognizant of how you can further mitigate the risks you have identified. Be suspicious of a low-risk “score” on a FRAT that may be camouflaging a risk area that doesn’t fit the boxes neatly.
By the same token, don’t meekly settle for the risk “score” your FRAT delivers. In most cases, you will be able to mitigate risks to a more acceptable level and confidently launch or continue the flight.


